Tile using Tutorials


I have tried and tried, but I just can't can't get my forests and big towns to look right, but it just won't work.
I was wondering if someone can write a simple tutorial for good and accurate use of the tiles and their corresponding sprites. I really need my forests and towns to look good.
I was wondering if someone can write a simple tutorial for good and accurate use of the tiles and their corresponding sprites. I really need my forests and towns to look good.


Takes a bit of fiddling around. If you want a specific appearance you might have to modify some things to ensure accurate hardness points for starters.
I'm sure Robj might create one for you if there isn't already one Here
I'm sure Robj might create one for you if there isn't already one Here


You mean the large building and dense tree tiles? Those are the only ones that have "corresponding sprites" as far as I recall.
Here's a tutorial on the trees:
1. Take the 4x4 block of tree tiles and stamp it right in the middle of the screen.
2. Place the 4x2 block of tree base tiles below it.
3. Place the tops-of-trees sprite above it.
4. Place sides-of-trees sprites on either side of it.
5. Make the tiles under the side-sprites fully hard.
6. Place a row of bottom-half hardness where the bottom of the tree-top sprites are. (That is, on the second row of the screen.) You should now have a closed box of hardness.
Now that you have the basics, go through those steps again with these substitutions:
1. Make a plus shape with 5 copies of the 4x4 tree tile block. (This will span a few screens, obviously.)
4. Take a sides-of-trees and clip it so it shows only one tree. Place these as needed, then do the other side. (This makes it easier when dealing with more complex shapes.)
And repeat once more using whatever layout of tree blocks you want in step 1. But remember, you have to make the whole forest using that 4x4 grid. If you try to stagger or overlap tiles it will get weird and probably ugly.
Now you can make forest just as good as in the original games... however there's still room for improvement. You could make the hardness a bit nicer, by rounding off the corners. And I would tweak the depth que of the side spites so it looks better when you brush against them. The que should be about the y-position of the base of the trunk.
So that's trees. I probably made it sound complicated, but it's actually easier done than said.
The buildings on the other hand really are all kind of a pain. My best advice is to examine the buildings in the original game (or a D-Mod) and see how they were put together. When you're ready to build something from scratch, it's just a matter of examining the pieces (both tiles and sprites) and finding which edges do or don't fit together in a way that looks natural.
Well, I've gotten a decent looking forest going, but I've discovered even if I learn how to use the building tiles, I'll not be able to make the town I've planned, because of the angle the buildings are at. I need pretty much vertical and horizontal, save for doorways...
There are alternative building sprites available (community designed) if you look hard enough, that should help you out. 
Yea, I found the sprite and tile combo for the building kind of weird.
I have some building packs, but none of them work. The only good ones are either unfitting (Evil Houses) or very limited in what you can make with them (ipladink's building pack). If you have a good idea of one, could you link it?
Well the buildings work nice once you figure out how to use them. Create some blank screens and select tile 8 and there should be part of your buildings. copy and stamp them down, then go to your sprite selector, and find the buildings that match, and mess around to see how it fits.

another way is get your house/building just right and then screen shot it, clean it up and and save as a new sprite (no moving parts hehe) less sprites on the screen - add a door and whammo working house
I did that with my current dmod - made new grave sites - look pretty cool if i say so myself
graves Each grave is only ONE sprite works fine cause of the low res allowed in dink
I did that with my current dmod - made new grave sites - look pretty cool if i say so myself
graves Each grave is only ONE sprite
works fine cause of the low res allowed in dink
<Sets all the building sprites on fire>

Heh, yeah, that's what I'm doing for HSL2 MsDink. So much easier than trying to figure out that overly complicated structure
The biggest problem is I can't get it looking right at all, so there is no chance for me to take a screenshot and save it as a bitmap...
I wonder how feasible it would be to convert the large building graphics to face south. I don't have the patience myself, but my first impression is that you could pull it off with a bit of effort.
Noooo no no no! Don't give up - use some good ole Kiwi ingenuity there megadog  -so many ways to get around a problem.
-Screenshot someone elses that looks good (maybe from the original?)
-Something in the way - open it in the editor and remove it before screenies
-Import a screen from another dmod into yours (with a house/building on it or a forest or whatever u are having trouble tiling... and change it to suit) Bigger buildings usually go across a few screeens, so, maybe import all of them so you have a complete building
@Paul - screenie it and reverse maybe 10 second job heh
-so many ways to get around a problem.-Screenshot someone elses that looks good (maybe from the original?)
-Something in the way - open it in the editor and remove it before screenies
-Import a screen from another dmod into yours (with a house/building on it or a forest or whatever u are having trouble tiling... and change it to suit)
Bigger buildings usually go across a few screeens, so, maybe import all of them so you have a complete building@Paul - screenie it and reverse maybe
10 second job hehCould always just add small decorative grass sprites or something to cover up bad looking edges too.


Let me give the buildings a try.
First things first: realize that large buildings *without* a corner in front are not possible, simply because there are no appropriate roof sprites.
Start out with the tiles. Right-facing walls are in tileset 34, left-facing walls are in tileset 35, and they come in units of 4x2.
Note the extra shading on the last two units in tileset 35. This is for corners in front. There seem to be no tiles with shading for corners in the back. On the other hand, even the original game doesn't use the shaded/non-shaded versions consistently.
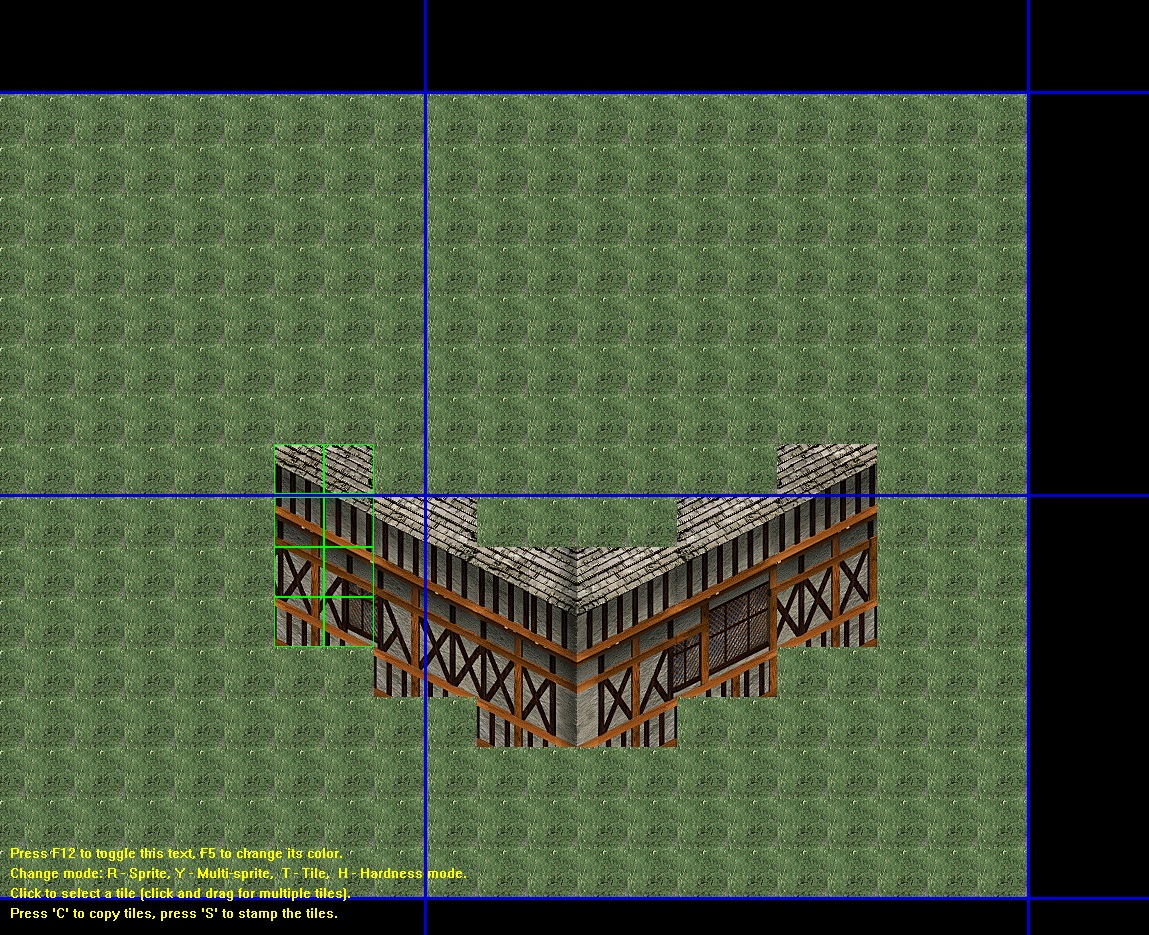
An example layout: here. Be aware of window placement, as windows span multiple units.
And that's it for tiles. We're going to surround them on every side with sprites, for which you may need to enable screenmatch occasionally.
They're all in sequence 33, so take a look at that now. You'll see a lot of ground-level walls (with or without doors, windows, and again shading for the left-facing walls), a couple of roofs, and some edge-cases.
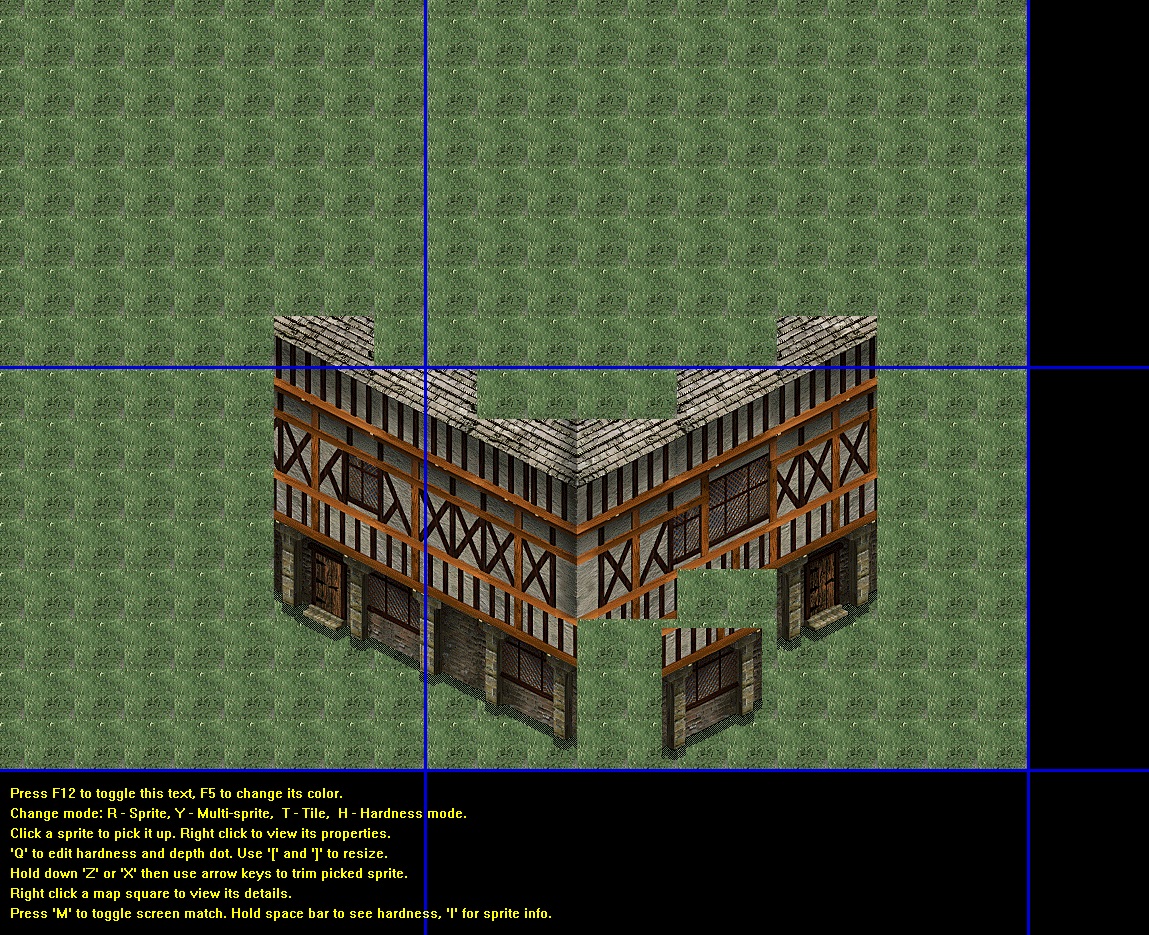
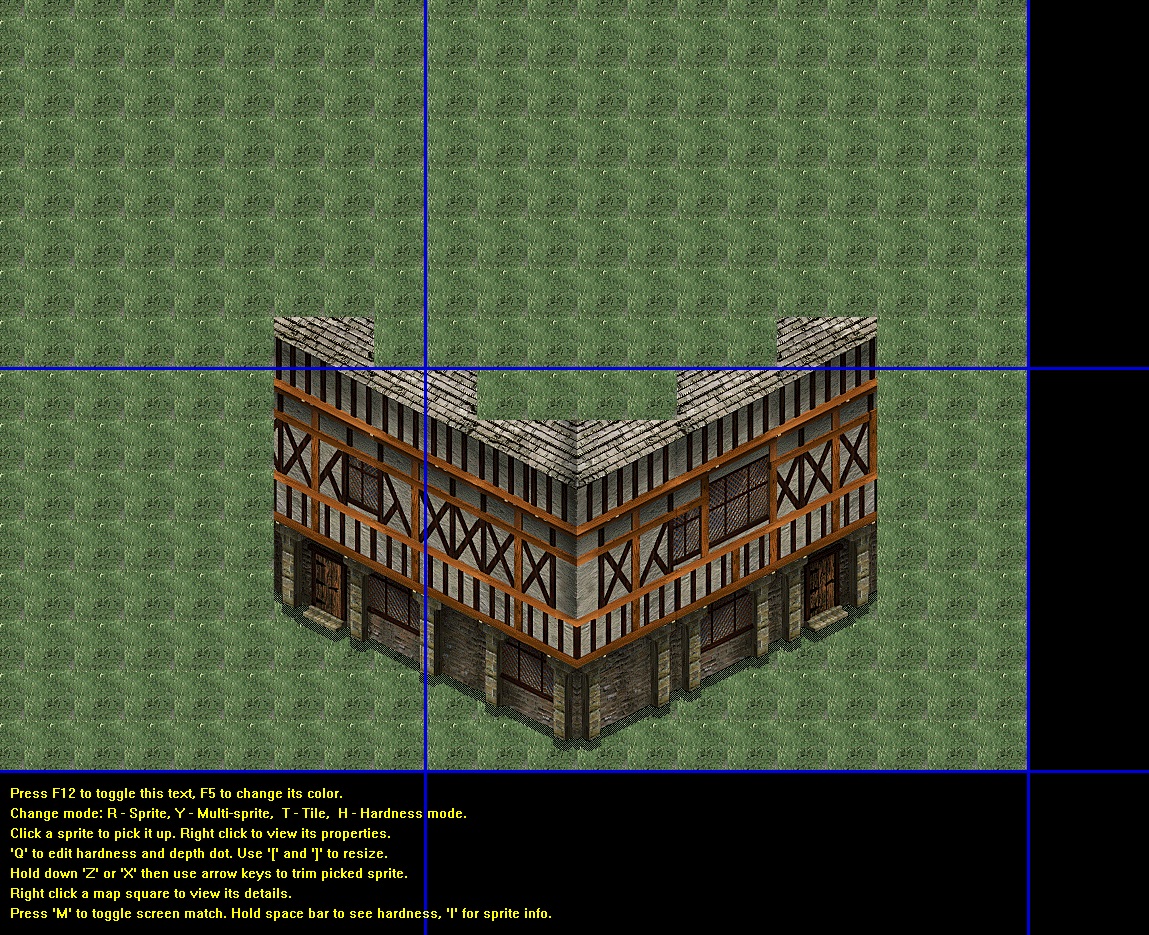
Place the ground-level walls first, as in these screenshots: in progress, finished. Note that I screwed up the shading, so don't make that mistake yourself. Finally, make sure the windows all line up correctly. They may span across multiple sprites again.
Now the sides. Frames 2 and 11 can be used for the bottom-right, frames 7 and 10 for the middle-right, frames 18 and 19 for the bottom-left, and frames 24 and 28 for the middle-left. The difference between them is, again, the presence of windows.
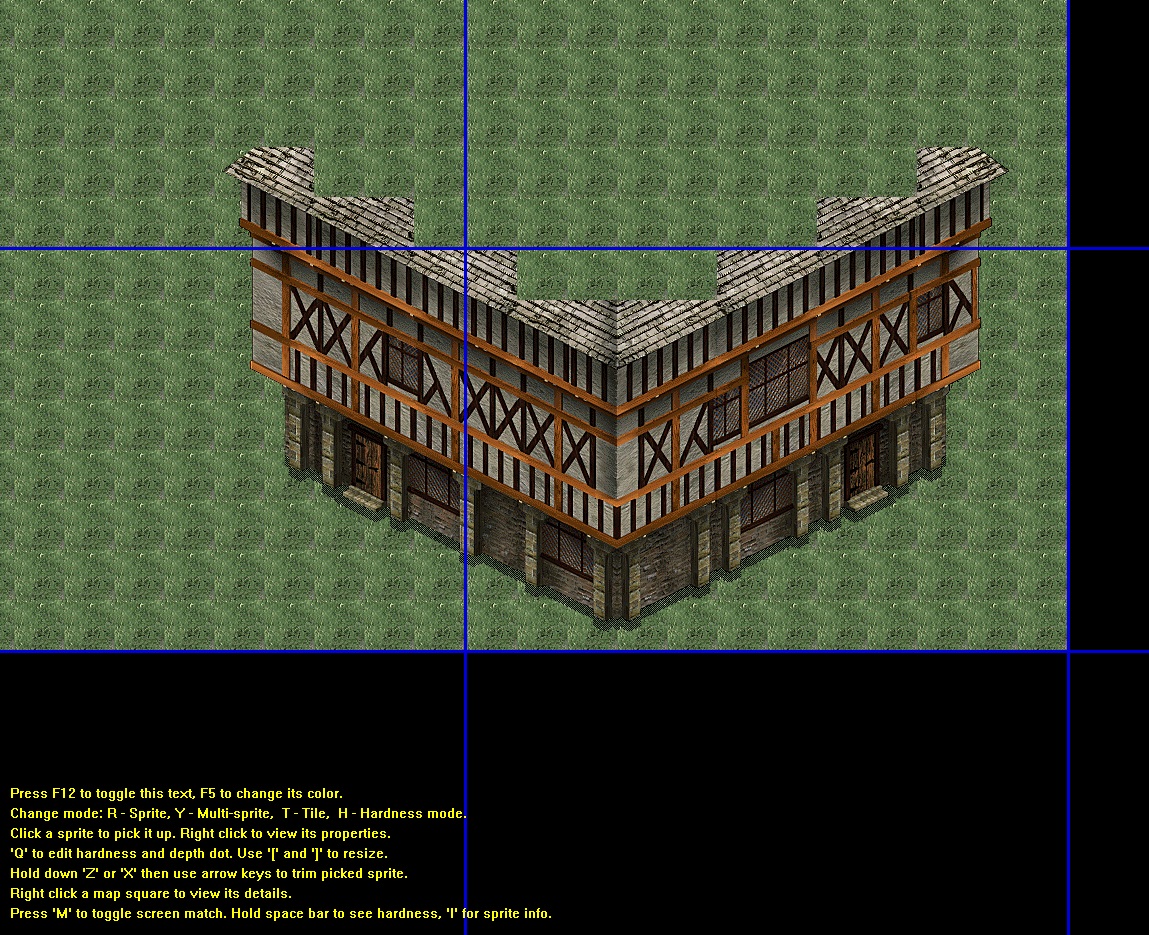
Again some screens: in progress, finished. (I still haven't fixed the shading in the front corner. Sorry.)
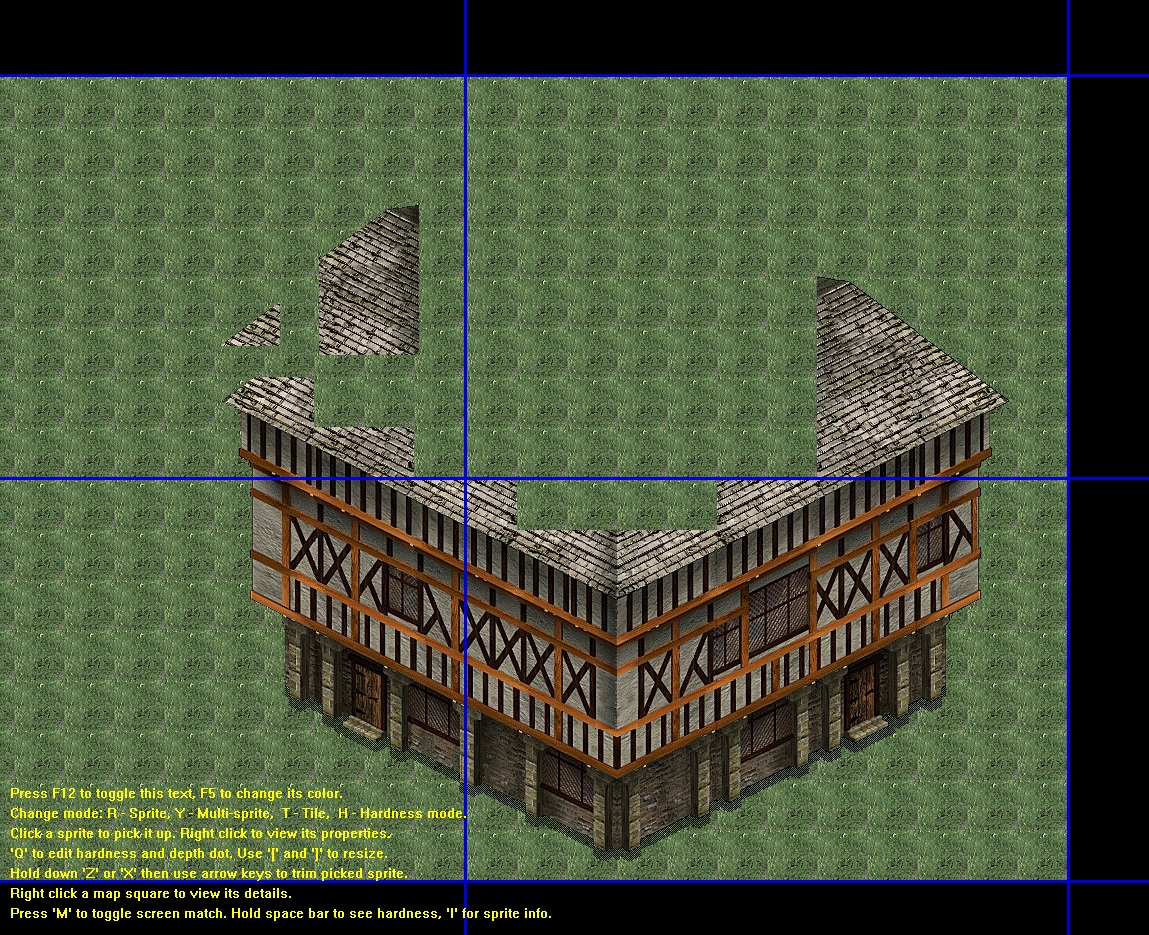
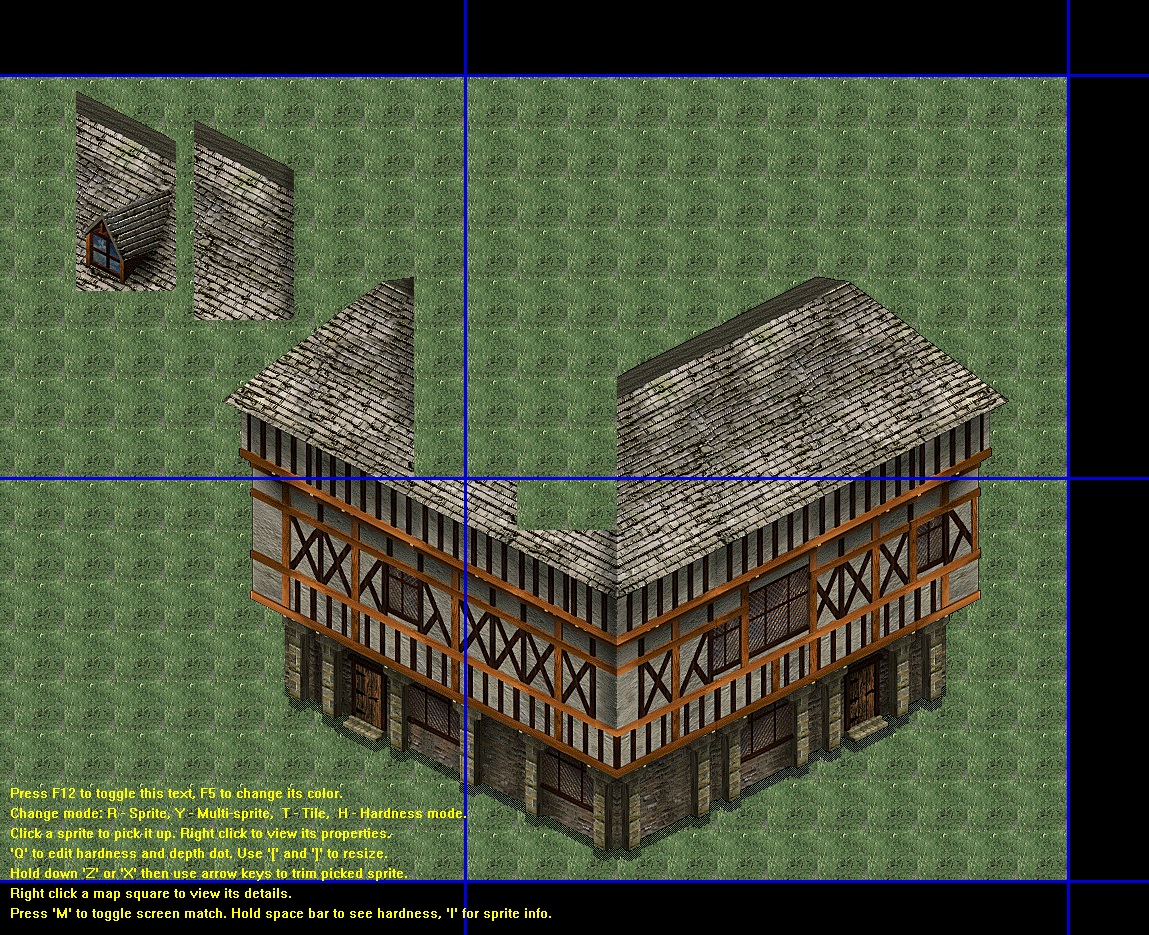
Finally, time for the roof. We'll start with the ends of the roof, which consist of two parts: a small triangle (frames 8 and 25. One for either side), and one that actually shows the end of the roof (frame 9 for the right side, frames 26 and 27 for the left side. One of them has shading, which I screwed up. Again.): in progress.
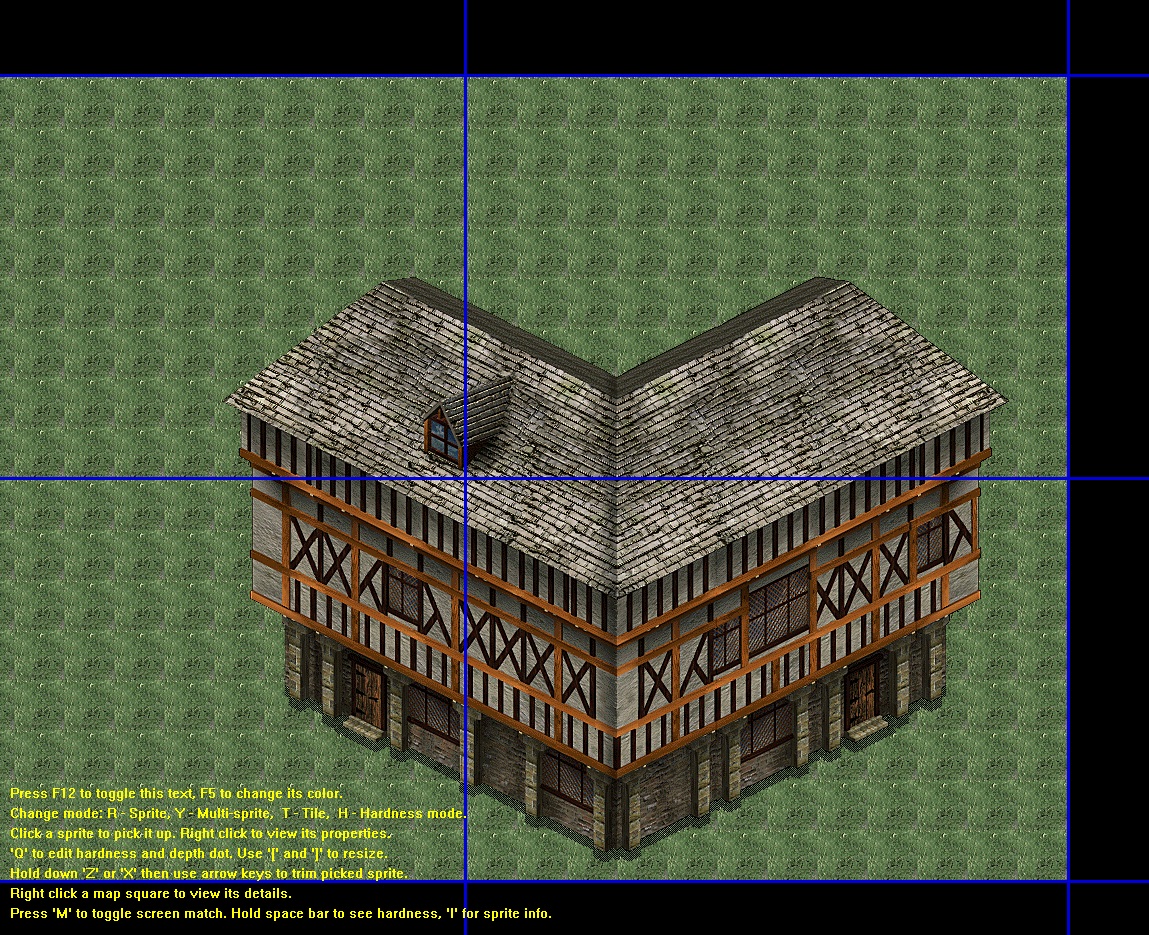
What remains is the rest of the roof. There are frames with roof window, and frames without, and for the left side, both exist with extra shading. in progress (shading still messed up), finished (and I've sneakily fixed the shading).
Hope this is of some use. You'll still need to take care of tile hardness yourself. And also don't forget to mess with depth dots, unless you want Dink (or other sprites) to suddenly appear in front of the roof, or behind the ground-level walls. The building looks still rather bland, but you can go nuts with signs and other decorations.
First things first: realize that large buildings *without* a corner in front are not possible, simply because there are no appropriate roof sprites.
Start out with the tiles. Right-facing walls are in tileset 34, left-facing walls are in tileset 35, and they come in units of 4x2.
Note the extra shading on the last two units in tileset 35. This is for corners in front. There seem to be no tiles with shading for corners in the back. On the other hand, even the original game doesn't use the shaded/non-shaded versions consistently.
An example layout: here. Be aware of window placement, as windows span multiple units.
And that's it for tiles. We're going to surround them on every side with sprites, for which you may need to enable screenmatch occasionally.
They're all in sequence 33, so take a look at that now. You'll see a lot of ground-level walls (with or without doors, windows, and again shading for the left-facing walls), a couple of roofs, and some edge-cases.
Place the ground-level walls first, as in these screenshots: in progress, finished. Note that I screwed up the shading, so don't make that mistake yourself. Finally, make sure the windows all line up correctly. They may span across multiple sprites again.
Now the sides. Frames 2 and 11 can be used for the bottom-right, frames 7 and 10 for the middle-right, frames 18 and 19 for the bottom-left, and frames 24 and 28 for the middle-left. The difference between them is, again, the presence of windows.
Again some screens: in progress, finished. (I still haven't fixed the shading in the front corner. Sorry.)
Finally, time for the roof. We'll start with the ends of the roof, which consist of two parts: a small triangle (frames 8 and 25. One for either side), and one that actually shows the end of the roof (frame 9 for the right side, frames 26 and 27 for the left side. One of them has shading, which I screwed up. Again.): in progress.
What remains is the rest of the roof. There are frames with roof window, and frames without, and for the left side, both exist with extra shading. in progress (shading still messed up), finished (and I've sneakily fixed the shading).
Hope this is of some use. You'll still need to take care of tile hardness yourself. And also don't forget to mess with depth dots, unless you want Dink (or other sprites) to suddenly appear in front of the roof, or behind the ground-level walls. The building looks still rather bland, but you can go nuts with signs and other decorations.


Bah, I'll find some other way to do buildings, those tiles don't work for horizontal and vertical lines...


